
Hi friends, My wife recently picked up a used Instant Pot® Duo 60. It looked great on the outside—screen lit up, buttons worked—but the heating element wouldn’t kick in. Since she really wanted a working one for her birthday, I decided to dive in and fix it.
If you’ve got an Instant Pot that powers on but won’t heat, this guide will walk you through the exact steps I took. Don’t worry—I’ll also point out what to check if your problem is a little different.
Step 1: Quick Checks Before Digging Deeper
When an Instant Pot doesn’t heat, the issue often comes down to one of these:
- Blown thermal cutoff fuse – This tiny component protects the cooker from overheating. You’ll find it where the red power wire meets the circuit board. Check for continuity with a multimeter.
- Blown glass fuse – Instant Pots also have a standard fuse that can fail. Easy to check, easy to replace.
If your unit shows no power at all, start here before opening the board. Replacement fuses are cheap and easy to order online.
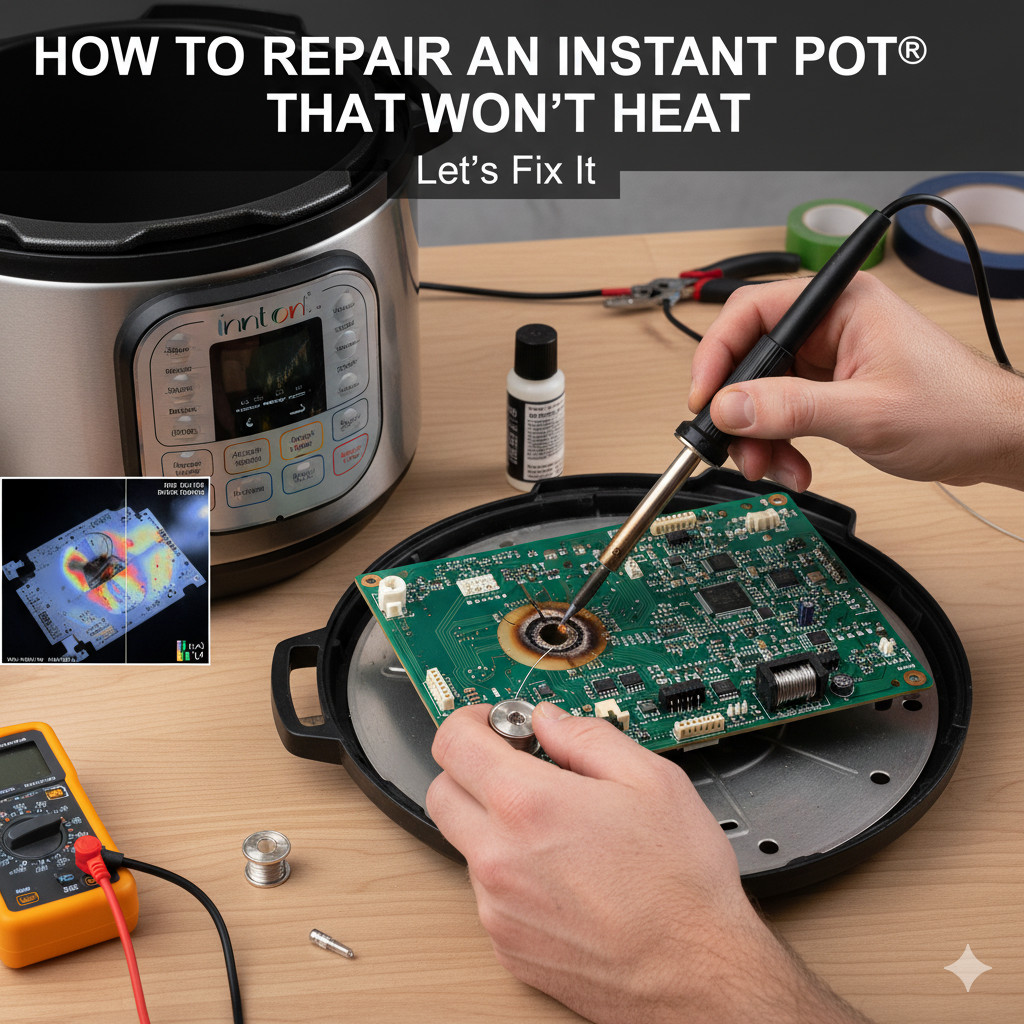
Step 2: Accessing the Circuit Board
The Duo 60 model makes repair surprisingly simple. Just remove one screw, twist the bottom cover, and you’ve got access to all the internals.
A couple of tips:
- Always unplug the pot first.
- When removing connectors, pull on the plastic housing, not the wires. Use a thumbnail to pop them loose.
- If it’s tight, remove the two side screws so you can wiggle the board out.
Step 3: Finding the Real Problem
Once I flipped the circuit board over, the issue was obvious. One of the relay pins had a black, burnt-looking ring around it. The solder joint had cracked, breaking the connection to the heating element.
That’s why the screen worked but the pot wouldn’t heat.
Step 4: Fixing the Bad Solder Joint
Here’s how I repaired it:
- Apply flux – This helps new solder flow and bond better.
- Heat the joint – Hold your soldering iron on the pin until the old solder melts.
- Add fresh solder – I used lead-free solder (common in appliances). Aim for a smooth, rounded connection around the pin.
- Clean the flux – Use isopropyl alcohol and a toothbrush to remove sticky residue.
If you don’t own a soldering iron, you can pick up an affordable kit online. It’s a good investment if you like DIY repairs.
Step 5: Testing the Instant Pot
After reassembling, I crossed my fingers and ran a one-minute cook cycle.
Good news—the pot clicked on, and my thermal camera showed the base heating up fast. Problem solved! My wife was thrilled to finally have a working Instant Pot for her birthday.
Key Takeaways
- If your Instant Pot has power but doesn’t heat, check fuses first.
- If fuses are fine, inspect the solder joints on the circuit board.
- A cracked solder joint is a common, repairable issue.
- With a bit of patience, a soldering iron, and flux, you can bring an Instant Pot back to life.
Why This Matters for US Households
Instant Pots are incredibly popular in American kitchens. They save time on weeknight meals, help with meal prepping, and even make cooking healthier. But buying a new one can set you back $80–$120. Repairing instead of replacing not only saves money but also keeps e-waste out of landfills.
So before tossing yours, consider giving it a second life.
Final Thoughts
Repairing this Instant Pot was simple, satisfying, and saved us from buying new. If you enjoy DIY fixes, this is one of the most approachable appliance repairs out there.
Got a similar issue? Start with the fuses, then check those solder joints. With a little care, you’ll likely have your Instant Pot back in action in under an hour.
Related articles
- Instant Pot Omni Pro Touch Screen Not Working
- instant pot pro crisp vs ninja foodi max
- Instant Pot Slow Cooker: Troubleshooting Tips and Tricks
- Instant Pot Slow Cooker Setting Not Working
- Why Did Instant Pot Declare Bankruptcy
- why is rice sticking to my instant pot?
- 13 Reasons Why Your Instant Pot Won’t Work or Pressurize
- Instant Pot Slow Cooker Function Not Working